Overview
Workato is a premium app that simplifies and maximizes workflow integrations. Workato empowers you to seamlessly create workflows between the CYPHER Learning platform and thousands of enterprise applications, such as ADP, BambooHR, GuideCX, Gusto, HubSpot, Microsoft Dynamics 365 CRM, Monday.com, Namely, Nimble, Oracle HCM, Paylocity, Pipedrive, Salesforce, SAP Success Factors, SugarCRM, TriNet, UKG, Workday, Zoho CRM and more!
Installing Workato
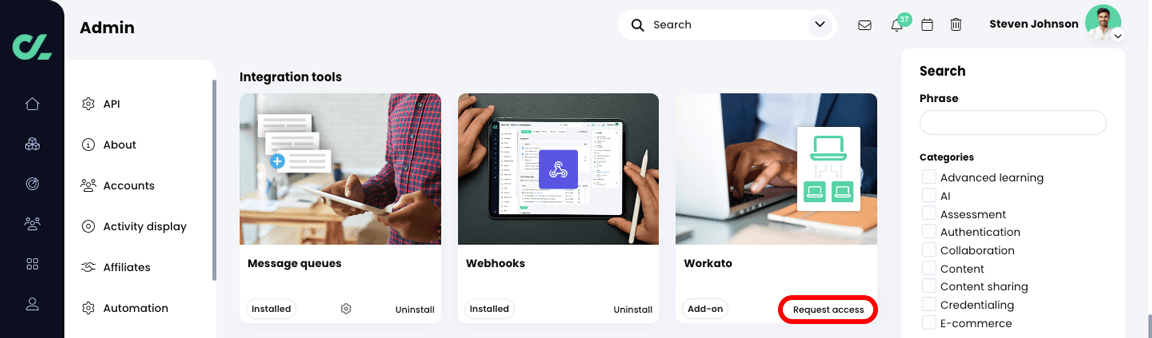
To begin, administrators request access to Workato through the App center:
- Click Admin from the primary navigation menu.
- Click App center from the fly-out menu.
- Click Request access on the Workato app in the Integration tools section.
You can also reach out to your Customer Success Manager to gain access to the Workato app.
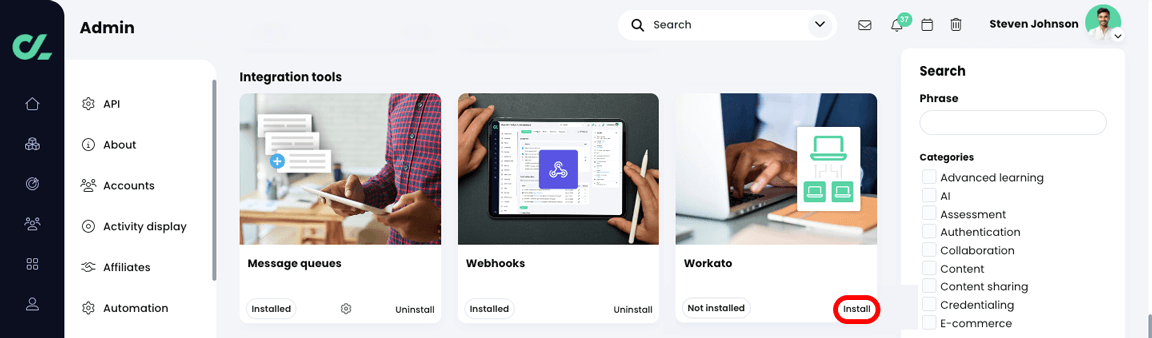
Once access is granted, the Workato app can be installed:
- Click Admin from the primary navigation menu.
- Click App center from the fly-out menu.
- Click Install on the Workato app in the Integration tools section.
Getting started with the Workato connector
Once the Workato app is installed, you'll need to add the Workato connector to your Workato account.
Click the Workato logo below to log-in to your Workato account and access the
Workato connector:Workato Resources
The following resources are available from Workato to help you learn the basics and set up your integrations:
Once Workato is installed and you have set up your Workato connector, you can enable Workato on your platform.
- Click Admin from the primary navigation menu.
- Click Workato from the fly-out menu.
The Workato configure page displays.
- Status: The current status of your Workato connection displays.
- Click Enable to enable Workato on your platform.
- Inbound messages: Manage the inbound messages for your Workato connection.
- Outbound events: Manage the outbound events for your Workato connection.
- Subscriptions: View currently selected subscriptions.
- Click Edit to update selected subscriptions.
Adding custom fields to a CYPHER object in Workato
Before you can use custom fields in Workato, they must be configured within the CYPHER platform.
To configure custom fields in CYPHER:
- Click Users on the primary navigation menu.
- Click Admin.
The Admin Accounts page displays.
- Click the Fields tab.
- Click + Add custom field.
The Add custom field pop-up displays.
- Choose the appropriate data type for your custom field (e.g., text, number, date).
- Complete the required forms to create the custom field in CYPHER.
Populating Custom Fields using Workato
- Locate the Custom Fields Box: In your Workato recipe, find the action or step where you want to populate the custom fields for a CYPHER object.
- Set to Formula Mode: Ensure the custom fields box is set to Formula mode instead of Text mode. This allows you to process each key-value pair individually.
- Create a Ruby Hash:
- Construct a Ruby hash where:
- Each key is the exact display_name of a custom field you defined in CYPHER.
- Each value is the data you want to populate the corresponding custom field with.
Save and Test: Save your Workato recipe and run a test to ensure the custom fields are populated correctly in CYPHER.
Adding additional fields in Workato connectors
In Workato connectors, certain fields, such as "_include", are optional. These fields allow you to request additional data from the API. When you pass a parameter into "_include", the API includes the associated data in its response to Workato. However, because this data is supplemental to the base object being returned, the fields from the included object do not automatically appear as data pills in Workato.
Understanding the Impact
The additional data provided via "_include" is not directly available as data pills. This means that to access the values within the included object, you need to know its structure and manually extract the values using bracket notation.
Example Usage
Suppose you use "_include" to request an associated object, such as progress. Here is an example of what the API response might return:
- {
- "id": 123,
- "name": "Sample Object",
- "progress": {
- "progress_percent": 0.35
- }
- }
In Workato, "field1" and "field2" will not appear as data pills. To access them, you would use bracket notation.
- For example: To retrieve "progress_percent", use: ["progress"]["progress_percent"]
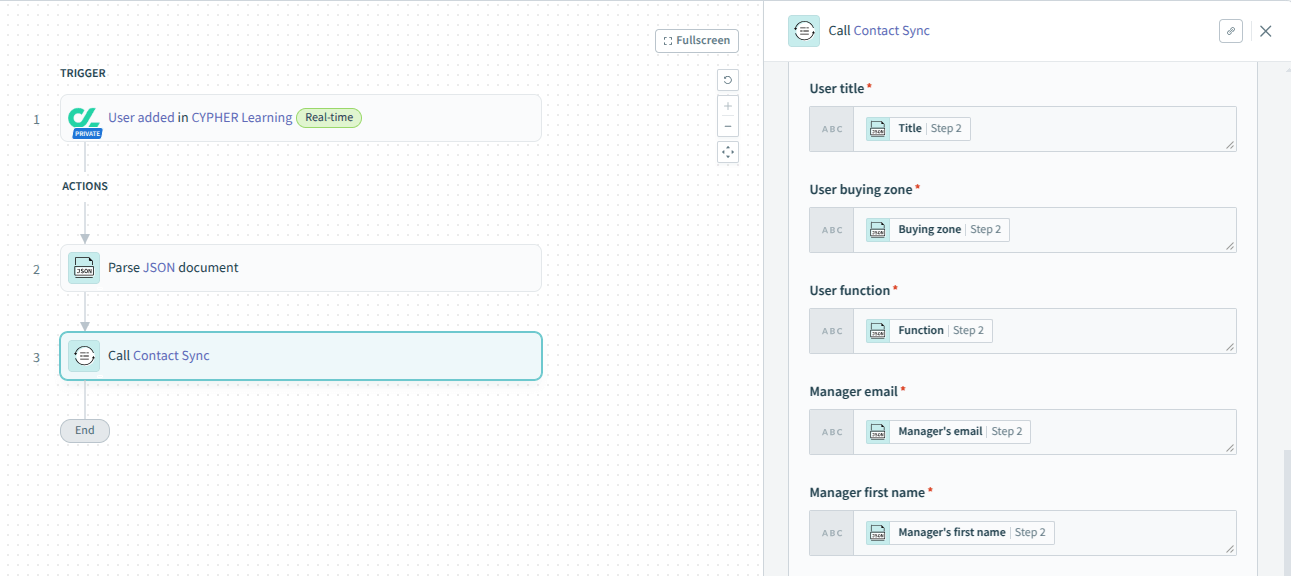
Paginating through CYPHER API in Workato
All list endpoints have the “$count” option (in Workato it’s “_count”). If this is set to true/Yes, the output will be a JSON object like: {"count": 123} providing the count of all records, not affected by the limit.
The Workato schema does not have this data, so it it must be accessed using the Formula mode, as in the screenshot below (Payload['count']). So the list endpoint would be called this way first, then populate 2 variables, usersToProcess and totalUsers, initially with the same value (the returned count).
Repeat → list records with limit 100 (maximum) and offset = totalUsers - usersToProcess.
Process as needed and subtract the list size (normally 100) from usersToProcess.
Full recipe:
Retrieving custom fields from a CYPHER learning object
Objects currently supporting custom fields are:
- User
- Course (Class)
- Organization
In the API or events output, the custom fields are structured as a JSON object with the key being the custom field name which is also visible in the UI.
Example for a course:
- {
- ...
- "organization_id": 12416,
- "organization_name": "Main Organization",
- "id": 78361,
- "name": "Design in Branding",
- ...
- "path": false,
- "custom_fields": {
- "Semester": "Two",
- "Difficulty": "hard"
- }
- }
In Workato, it is not currently possible to map dynamic objects to data pills. However, there are some workarounds, which vary for actions and triggers:
- Actions: the custom fields data pill is an object that can be accessed like a regular JS object or Ruby hash.
- Triggers: the custom fields data pill is a string representing a Ruby hash (as if calling to_s on the hash).
Actions
In the case of actions, the custom fields object can be accessed like a regular JS object or Ruby hash. For this, the field must be set to “Formula” mode.
For example, in order to access the value for “Semester”, you can add ["Semester"] to the custom fields data pill:
Triggers
In the case of triggers, there is custom code in the connector that transforms the Ruby hash string representation to a more generic JSON string.
So from this string:
{"Manager's First Name"=>nil, "Manager's Last Name"=>nil, "Manager's Email"=>"Manager email 1527", "Function"=>"VP, Optimization Services", "Buying Zone"=>"Buying \"Zone\"' 152", "Title"=>nil, "Has Direct Reports"=>nil}
You get this string:
{"Manager's First Name":null, "Manager's Last Name":null, "Manager's Email":"Manager email 1527", "Function":"VP, Optimization Services", "Buying Zone":"Buying \"Zone\"' 152", "Title":null, "Has Direct Reports":null}
This string can then be used as input for the app
JSON Parser by Workato, which then outputs data pills for each custom field.
The JSON parser needs a sample of the JSON to determine the correct field mappings. This can be achieved by doing a test run of the recipe, or manually building the JSON based on the custom fields you created in the front end.
The values in the sample document are not relevant, only the keys are, so they can be arbitrary strings or "null".
After this step, the JSON parser makes each key-value pair available as a data pill.
Batch processing using CYPHER Connector in Workato
CYPHER Learning has implemented API rate limitations. This leads to difficulty importing large numbers of records individually.
In order to overcome this, batch processing can be implemented.
Instantiate variables
Create 2 string variables, one to hold all of the data, and the other to hold the data in batches. Toggle the variable holding allData into formula mode, and select the list containing all of the data as the input for the variable.
Using Workato’s variable connector, create a list to hold batch IDs - this is crucial for validating batch item success and debugging batch interruptions.
Do not initialize this with any data.
Create a while loop in Workato. The terminating condition will be while allData is present. Inside this while loop, update the value of “batch” to be the first 100 items from allData.
Python snippet for formatting CYPHER batch input
Create a python snippet to format the string into a list that can be used by the CYPHER Connector.
The input will need to be in formula mode, so the python snippet parses through the batch variable instead of treating it like a string.
The output will need to be customized to the data fields you are trying to pass into the CYPHER batch action. The output should be a list, with the relevant fields nested below it.
Pro tip - refer to the original source of data. Hover over a field to find the API name. This is the name that the field will have in your python script. Ensuring the field name in the output matches the API name directly will ensure that no data is lost. For more information about Python snippets in Workato, please refer to the
Workato connectors - Python snippets by Workato documentation.
The image below is an example of retrieving the API name from the data course for accurate mapping to the Python output.
The full settings of the Python snippet are displayed below.
Python snippet code:
- import json
- def main(input):
- batch = input['batch'] # or the name of your input variable. Click "Edit Schema" to find the "name" of your input field.
- if isinstance(batch, str):
- batch = json.loads(batch)
- return {"batch_as_list": batch}
Map output to CYPHER Batch Action
Once you are receiving datapills for the batch, map those Python output fields to the CYPHER batch function.
Add the result from the batch action to the BatchIDs list.
Update allData to remove the processed data from the list by updating the variable in formula mode, and subtracting batch from allData. THIS STEP IS CRUCIAL to avoid an infinite loop.
Batch validation using CYPHER Connector in Workato
Use the get batch action from the CYPHER Workato Connector to get the status and details of each batch. If the status is “Pending”, try the “Get batch” action again after a short delay. The Results array that is returned from a finished batch includes information for each item passed into the batch, and whether that record was successfully processed or not, and why.
